
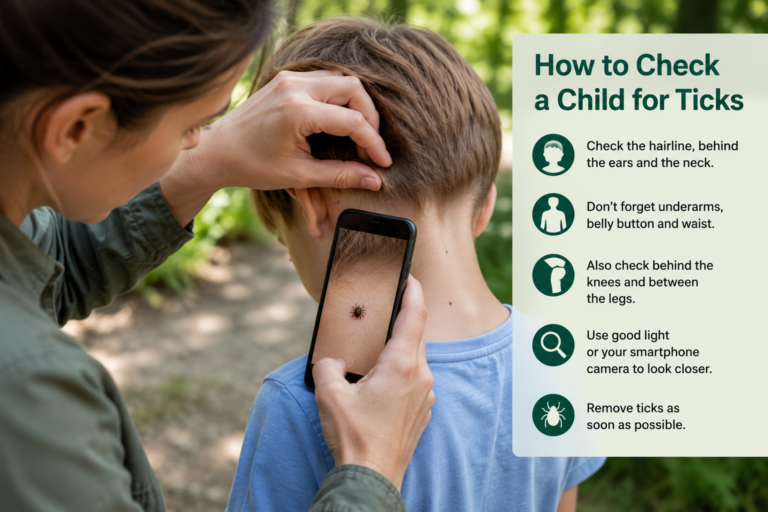
Tick Checks for Children
How to Check a Child for Ticks
Check a child for ticks from head to toe after time outdoors. Pay particular attention to the scalp, hairline, ears, neck, armpits, waist, belly button, groin, backs of the knees, ankles and spaces between the toes.
This guide explains how to perform a calm and systematic tick check, protect your child’s privacy and use the Tick Camera to inspect tiny or difficult-to-see spots.
How to Check a Child for Ticks at a Glance
Choose a bright, warm and private room. Check clothing first, then follow the same head-to-toe routine each time.
- Inspect the child’s clothing, shoes and outdoor equipment.
- Check the hairline and entire scalp.
- Look in and behind both ears.
- Inspect the neck, shoulders and under the arms.
- Check the chest, back, waist and belly button.
- Inspect the groin and between the legs with appropriate privacy.
- Check the buttocks and upper thighs.
- Inspect the fronts and backs of both knees.
- Check the lower legs, ankles and sock lines.
- Inspect both feet and between every toe.
- Look closely at every unfamiliar dark spot or bump.
A complete check is important because a tick can attach anywhere on the body, not only in the most common hiding places.
What Should You Do Before Checking a Child?
A little preparation makes the check faster, calmer and more thorough.
Choose a private and well-lit room
Use bright, even lighting and keep the room warm enough for the child to change clothes comfortably.
A bathroom, bedroom or another quiet room with a mirror can work well.
Explain what you are doing
Use simple and reassuring language.
You might say:
“We are checking for tiny ticks that can sometimes come home with us after playing outside. I will look carefully and tell you before I check each area.”
Prepare useful items
Have the following nearby:
- A comb
- Hair clips
- A handheld mirror
- Bright lighting
- Your smartphone
- Fine-tipped tweezers in case a tick is found
- A sealed container or tape for a removed tick
Ask about unfamiliar spots
Older children may know which freckles, moles or skin marks are normally present.
Ask them to point out familiar marks before assuming that every dark spot could be a tick.
Check for injuries or irritation
Scratches, scabs, insect bites and dirt can resemble very small ticks.
Do not scratch or pull at an unfamiliar spot before inspecting it carefully.
Check the Child’s Clothing First
A tick may be crawling on clothing without yet being attached to the skin.
Inspect outdoor clothing
Check:
- Shirts and jackets
- Trousers and shorts
- Underwear
- Socks
- Shoes and boots
- Hats and caps
- Gloves
- Scarves
Look along seams and folds
Ticks can be difficult to see along dark seams, cuffs, waistbands and pockets.
Check shoes and socks carefully
Inspect inside shoes and around the top edges of socks.
Small ticks may resemble dirt, plant material or a tiny seed.
Inspect outdoor equipment
Check backpacks, blankets, coats, sports equipment and other items used outdoors.
Keep outdoor clothing separate
Do not place unchecked outdoor clothing directly on beds, sofas or clean clothing.
How to Check a Child for Ticks Step by Step
Follow the same order every time. A predictable routine helps prevent missed areas and makes the check easier for the child.
1. Start with the forehead and hairline
Inspect the forehead, temples and the entire front hairline.
Look for tiny dark dots, seed-like bumps or unfamiliar marks.
2. Check the scalp
Part the hair into small sections and inspect the exposed scalp.
Use your fingertips to feel gently for small firm bumps beneath the hair.
3. Inspect in and behind the ears
Look at the visible outer ear, behind the ear and in the crease where the ear meets the head.
Do not insert tweezers, cotton swabs or camera accessories into the ear canal.
4. Check the back of the neck
Move long hair aside and inspect the neck, collar line and area beneath helmet or backpack straps.
5. Inspect the shoulders
Check across both shoulders and the upper back.
Use a mirror when necessary.
6. Check under both arms
Raise one arm at a time and inspect the entire armpit.
Look at the front, centre and rear of each skin fold.
7. Inspect the arms and hands
Check the upper arms, elbows, forearms, wrists, palms, backs of the hands and between the fingers.
Remove watches, bracelets and wristbands.
8. Check the chest and stomach
Inspect the chest, ribs and abdomen.
Look beneath clothing lines and around any skin folds.
9. Look inside the belly button
Use bright light and inspect gently without poking or scraping the skin.
10. Check the back
Inspect between the shoulder blades, along the spine and across the lower back.
This area usually requires help from an adult or the use of mirrors.
11. Inspect around the waist
Look beneath waistbands, belts and elastic clothing.
Check the sides of the body and lower back as well as the front waistline.
12. Check the groin and upper inner thighs
Explain what you are checking before moving clothing.
Protect the child’s privacy and allow an older child to inspect private areas themselves when appropriate.
13. Inspect the buttocks
Check the skin and nearby folds while keeping the child appropriately covered.
14. Check the thighs
Inspect the front, back and inner surfaces of both thighs.
15. Look behind both knees
Bend each knee slightly and inspect the entire skin fold.
Small ticks in this area may resemble freckles or dirt.
16. Check the lower legs
Inspect the shins, calves and areas around sock lines.
17. Inspect the ankles
Look around the entire ankle, including beneath anklets or tightly fitting socks.
18. Check the feet
Inspect the tops, soles and heels of both feet.
19. Look between every toe
Separate the toes gently and inspect each space.
20. Recheck suspicious spots
Use bright lighting and examine every unfamiliar dark spot or raised area from more than one angle.
How to Check a Child’s Hair and Scalp for Ticks
The scalp deserves particular attention because hair can hide both the tick and its attachment point.
Begin around the hairline
Check the forehead, temples, above the ears, behind the ears and the back of the neck.
Divide the hair into sections
Use a comb to create a narrow part. Inspect the exposed line of scalp, then move the part slightly and repeat.
Use hair clips
Clips can keep checked sections separate from unchecked sections, especially with long or thick hair.
Run your fingertips over the scalp
Feel gently for tiny firm or seed-like bumps.
Inspect every bump visually
If you feel something unfamiliar, part the hair completely around it and examine where it meets the skin.
Use a second adult when useful
One person can hold the hair aside while another uses good lighting or the camera.
Check curly or textured hair slowly
Work through small sections rather than relying on a quick visual check of the surface.
Do not cut blindly around a bump
Avoid using scissors close to the scalp when the skin and object are not fully visible.
How to Check a Younger Child or Toddler
Young children may find it difficult to remain still for a full-body check.
Choose a calm time
Check after bathing, changing clothes or when the child is relaxed.
Keep the routine short
Prepare all equipment in advance and move systematically from head to toe.
Use distraction
A toy, song, story or short video can help the child remain still.
Let the child sit with a trusted adult
One adult can comfort the child while another completes the check.
Check in stages when necessary
If the child becomes distressed, take a short break and continue until all areas have been checked.
Do not use forceful restraint
A frightened child may move suddenly, making close inspection or tick removal unsafe.
How to Check an Older Child or Teenager
Older children can participate in the check and should be given greater privacy.
Explain the full routine
Give the child a clear list of areas to inspect.
Let them check private areas
Provide a mirror and allow the child to inspect the groin, buttocks and chest themselves when appropriate.
Help with difficult areas
An adult may still need to inspect the scalp, back, behind the ears and other places the child cannot see easily.
Encourage them to report unfamiliar marks
Ask them not to scratch or pull at a dark spot before showing it to an adult.
Respect their choice of caregiver
Allow the child to choose which trusted adult assists when possible.
How to Keep a Child Calm During the Check
Stay calm yourself
Children often follow the emotional tone of the adult performing the check.
Explain each next step
Tell the child which body area you will inspect before touching it.
Avoid alarming language
Do not suggest that finding a tick automatically means the child is ill.
Offer simple choices
The child might choose:
- Whether to sit or stand
- Which toy to hold
- Which area to check first
- Whether to look at the camera image
- Which trusted adult helps
Use praise
Thank the child for remaining still and helping with the check.
Make tick checks routine
A familiar post-outdoor routine can reduce fear and resistance over time.
What Should You Do If You Find a Small Spot?
A dark or raised spot is not automatically a tick.
Possible look-alikes include:
- A freckle
- A mole
- A small scab
- A skin tag
- A splinter
- Dirt
- A tiny seed
- Another small insect
- A minor skin bump
Move into brighter lighting
Good light helps reveal the outline, legs and attachment point.
Do not scratch the spot
Scratching can damage a scab, mole or attached tick.
Look for a separate body
A tick normally has an oval, rounded or seed-like body sitting above the skin.
Look for legs
Small legs may be visible near the front or sides.
Inspect the attachment point
Look at the narrow area where the object meets the skin.
View it from more than one angle
Legs may be hidden beneath the body, hair or a skin fold.
Do not pull until you are reasonably sure
Pulling at a mole, scab or other skin feature can cause injury.
When Should You Check a Child for Ticks?
Check after the child has spent time in places where ticks may be present.
This includes:
- Woodland
- Long grass
- Brush and leaf litter
- Parks and gardens
- Campsites
- Nature trails
- Farms and rural areas
- Outdoor sports fields
- Areas used by deer or other wildlife
Check after outdoor play
Perform the check as soon as practical after the child comes indoors.
Check during bathing
Bathing provides another opportunity to inspect the skin and scalp.
Check when changing clothes
Changing helps expose areas that may have been covered outdoors.
Check after contact with pets
Dogs and cats can carry unattached ticks indoors on their coat.
Check again if exposure was significant
A second check later can help find a small tick that was missed initially.
What Should You Do If You Find an Attached Tick?
Remove the tick promptly and carefully with clean fine-tipped tweezers or a suitable tick-removal tool.
Grasp the tick as close to the skin as possible and pull upward using slow, steady pressure. Do not twist, jerk, burn or crush the tick.
How to Remove a Tick From a Child
Clean the bite area
After removal, clean the skin and wash your hands.
Record the date and location
Note when the tick was found and where it was attached.
Take a clear photograph
Photograph the bite area in bright, neutral lighting for later comparison.
Check for additional ticks
Complete the entire head-to-toe routine even after finding one tick.
Monitor the child
Watch the bite area and the child’s general health over the following days and weeks.
Seek medical help for sensitive locations
Contact a healthcare professional if the tick is near the eye, deep inside the ear, inside the mouth or cannot be removed safely.
When Should You Contact a Healthcare Professional?
Seek medical advice when removal is difficult or concerning symptoms develop.
Contact a healthcare professional if:
- The tick cannot be removed safely
- The tick is attached near the eye
- The tick is deep inside the ear
- The tick is inside the mouth
- Several ticks are attached
- The bite area becomes increasingly painful or swollen
- The area produces pus or discharge
- A spreading circular, oval or unusual rash develops
- The child develops fever or chills
- The child develops headache
- The child becomes unusually tired
- The child develops muscle or joint pain
- The child develops facial weakness
- The child appears generally unwell
Removing an attached tick promptly is recommended, and the bite area should then be monitored for changes.
Do not wait for a perfect bull’s-eye rash
A concerning rash can be solid, circular, oval or irregular rather than forming a textbook target.
Tell the clinician about the exposure
Provide the date of the check, bite location, likely exposure area and any photographs.
Seek urgent help for severe symptoms
Seek urgent medical assistance if the child develops breathing difficulty, fainting, confusion, severe weakness, severe headache or rapidly worsening illness.
Common Mistakes During a Child Tick Check
Checking only exposed skin
Ticks can crawl beneath clothing before attaching.
Skipping the scalp
Hair can conceal very small and larger ticks completely.
Looking only at common hiding places
Ticks can attach anywhere, so complete the entire body check.
Checking too quickly
Small ticks may resemble freckles, dirt or tiny scabs.
Using poor lighting
Shadows and dim light can hide the body and legs.
Pulling at every dark spot
Inspect freckles, moles, scabs and skin tags before touching them.
Ignoring the child’s privacy
Explain what you are doing and allow older children to inspect private areas themselves.
Forcing a frightened child
Take a short break rather than creating fear or unsafe sudden movements.
Forgetting clothing and equipment
Unattached ticks may remain on hats, shoes, backpacks or coats.
Stopping after finding one tick
Continue the check because more than one tick may be present.
Frequently Asked Questions About Checking Children for Ticks
What is the best way to check a child for ticks?
Use a consistent head-to-toe routine in bright lighting. Check the clothing first, then inspect the scalp, ears, neck, armpits, waist, belly button, groin, knees, ankles, feet and toes.
Where are ticks most commonly found on children?
Important areas include the hair and scalp, in and behind the ears, under the arms, around the waist, inside the belly button, between the legs and behind the knees.
How do I check a child’s scalp for ticks?
Part the hair into small sections and inspect each exposed line of scalp. Use your fingertips to feel for unfamiliar firm bumps.
Can ticks hide under a child’s clothing?
Yes. A tick can crawl beneath clothing and attach around the waist, groin, chest, armpits or other covered areas.
How soon should I check after outdoor play?
Check as soon as practical after the child comes indoors. Inspect clothing first and then complete a full-body check.
Should I check a child every day?
Daily checks are useful when a child spends time in areas where ticks are common, particularly during tick season or after outdoor activity.
Can I use a phone camera to check for ticks?
A phone camera can help inspect difficult areas and tiny spots, but it cannot diagnose an infection or reliably identify every object.
What should I do if I cannot tell whether a spot is a tick?
Do not pull or scratch it. Use bright lighting and magnification and seek medical advice when the object remains unclear.
What should I do if I find a tick?
Remove it promptly with fine-tipped tweezers or a suitable tick-removal tool, clean the area, document the bite and monitor the child afterward.
When should I contact a doctor?
Seek medical advice if the tick cannot be removed safely or the child develops a spreading rash, fever, headache, unusual tiredness, muscle or joint pain, facial weakness or another concerning symptom.
Your Next Step
Sources
This guide was prepared using information from recognized public-health organizations.
Centers for Disease Control and Prevention: Preventing Tick Bites ↗
Centers for Disease Control and Prevention: Lyme Disease – What You Need to Know ↗
Centers for Disease Control and Prevention: What to Do After a Tick Bite ↗
UK Health Security Agency: Lyme Disease Signs and Symptoms ↗
Learn more about our research and review process in our Editorial Policy and Sources and References.