
Tick Removal for Children
How to Remove a Tick From a Child Safely
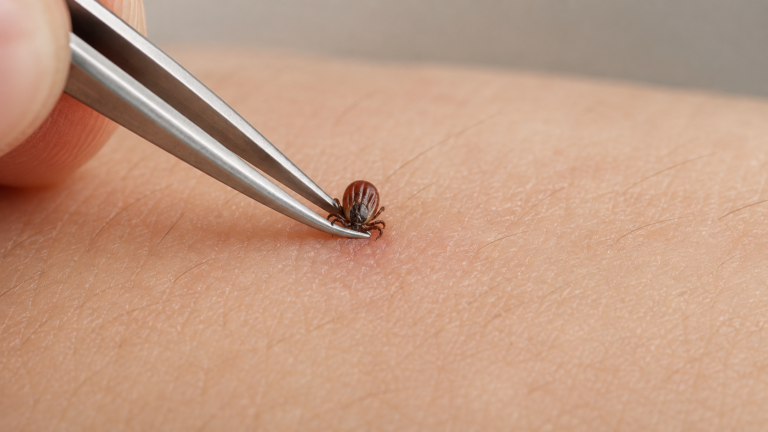
To remove a tick from a child, use clean fine-tipped tweezers, grasp the tick as close to the skin as possible and pull steadily away from the skin without twisting, jerking or squeezing the tick’s body.
This guide explains how to prepare your child, remove the tick step by step, handle difficult locations and use the Tick Camera to inspect and document the area before and after removal.
How to Remove a Tick From a Child at a Glance
Remove an attached tick promptly, but take a moment to prepare the child and position the tweezers correctly.
- Move to a bright and calm place.
- Explain simply what you are going to do.
- Wash your hands and prepare clean fine-tipped tweezers.
- Part hair or move clothing away from the tick.
- Grasp the tick as close to the skin as possible.
- Pull steadily away from the skin without twisting or jerking.
- Do not squeeze the swollen body of the tick.
- Clean the bite area and wash your hands.
- Record the date and location of the bite.
- Monitor the child and the bite area afterward.
If the tick is attached near the eye, deep inside the ear, inside the mouth or in another location where it cannot be reached safely, seek medical assistance rather than attempting a difficult removal.
What Do You Need to Remove the Tick?
Prepare everything before asking the child to remain still.
- Clean fine-tipped tweezers or a suitable tick-removal tool
- Bright, even lighting
- Soap and water or an appropriate skin cleanser
- Clean tissue or gauze
- A sealed container or tape for the removed tick
- A phone or camera for documentation
- A second adult when useful
- A small distraction for the child
Fine-tipped tweezers
Fine tips make it easier to grasp the tick close to the child’s skin without pressing on the larger part of its body.
Avoid broad or blunt tweezers when they make it difficult to reach the attachment point.
Tick-removal tool
A suitable commercial tick-removal tool may also be used according to its instructions.
Different tools work in different ways. Follow the manufacturer’s directions rather than automatically using the same movement as with tweezers.
Good lighting
Use bright, even light so you can clearly see the tick’s body and the point where it enters the skin.
Avoid strong glare or shadows that hide the attachment point.
A second adult
One adult can reassure the child, hold hair aside or support a limb while the other adult removes the tick.
The second adult should help the child remain comfortably still rather than pinning or frightening them.
How to Prepare Your Child for Tick Removal
A calm child is easier and safer to help. Explain the procedure honestly without making it sound frightening.
Use simple language
You might say:
“There is a small tick attached to your skin. I’m going to use these tweezers to lift it off. You may feel a small pull, but I will be careful.”
Do not describe it as an emergency
Stay calm and matter-of-fact. Your tone can influence how the child reacts.
Show the child the tweezers
Let the child see what you will use. Explain that the tweezers are for gripping the tick, not cutting the skin.
Give the child a simple job
The child might:
- Hold a toy
- Watch a short video
- Take slow breaths
- Count aloud
- Hold a mirror if appropriate
- Keep one body part still
Choose a comfortable position
The correct position depends on where the tick is attached. The child may sit, lie down or rest a limb on a stable surface.
Make sure you can see and reach the tick without stretching or working at an awkward angle.
Protect the child’s privacy
Keep the child appropriately covered and explain before moving clothing or inspecting a private area.
Older children may prefer to position clothing themselves or have a particular trusted caregiver present.
How to Remove a Tick From a Child Step by Step
Use slow, controlled movements. The goal is to grasp the tick close to the skin and remove it without crushing the body.
1. Move to a bright and private place
Choose a calm room with good lighting. Make sure the child is comfortably positioned and the attachment site is easy to reach.
2. Wash your hands
Wash and dry your hands before beginning. Gloves may be worn when available, particularly if the skin is broken or the tick is engorged.
3. Prepare the tweezers
Use clean fine-tipped tweezers. Check that the tips meet properly and can grip a small object securely.
4. Expose the entire tick
Move clothing away and part any hair completely around the tick.
Do not cut hair close to the skin when you cannot clearly see the tick and surrounding area.
5. Identify the attachment point
Look for the narrow point where the front of the tick meets the skin.
The swollen or rounded portion is the body. Avoid gripping this area when possible.
6. Position the tweezers close to the skin
Approach the tick carefully and place the tweezer tips around it as close to the skin’s surface as possible.
Try not to pinch the child’s skin between the tweezer tips.
7. Grip the tick firmly
Use enough pressure to hold the tick securely without unnecessarily squeezing or crushing its body.
8. Pull steadily away from the skin
Pull using slow, steady and even pressure.
Do not jerk the tweezers. When using standard fine-tipped tweezers, do not deliberately twist the tick.
9. Continue until the tick releases
Maintain steady pressure. Do not repeatedly release and re-grip the swollen body.
The tick may not detach immediately, but controlled pressure is preferable to a sudden forceful pull.
10. Move the tick away from the child
Place the removed tick directly into a sealed container or onto adhesive tape.
Do not place it loose on a table, bed or floor.
11. Inspect the bite area
Check that the tick’s body is no longer attached. A tiny dark point may remain at the site.
Do not immediately dig into the skin if a small fragment cannot be grasped easily.
12. Clean the skin
Clean the bite area gently with soap and water, rubbing alcohol or another appropriate skin-cleaning method.
13. Wash your hands and clean the tool
Wash your hands after handling the tick. Clean the tweezers or removal tool according to its instructions.
14. Reassure the child
Tell the child that the tick has been removed. Praise them for remaining still and cooperating.
What Should You Avoid During Removal?
Several common home remedies can make the removal process less controlled or irritate the skin.
Do not squeeze the tick’s body
Avoid gripping the enlarged abdomen when you can reach the tick closer to the skin.
Do not jerk the tick
A sudden pull can cause the tick to break or make the tweezers slip.
Do not deliberately twist standard tweezers
When using fine-tipped tweezers, pull steadily away from the skin rather than rotating the tick.
A commercial removal tool may have different instructions, which should be followed exactly.
Do not burn the tick
Do not use a match, lighter, heated needle or other hot object near the child’s skin.
Do not cover it with household substances
Do not apply petroleum jelly, nail polish, oil, glue or other household products in an attempt to make the tick detach.
Do not crush it with your fingernails
Avoid handling or crushing the tick with bare fingers.
Do not cut around the skin
Never use a blade, scissors or nail clippers to remove an attached tick.
Do not spend too long taking photographs
A quick, clear photograph may be useful, but proper removal should not be delayed merely to obtain a better image.
Do not force a struggling child
Stop if sudden movement makes the procedure unsafe. Reposition the child, ask another adult to help or seek professional assistance.
How to Keep a Child Calm During Tick Removal
Children may become frightened by the tick, the tweezers or the idea of something attached to their skin.
Stay at the child’s eye level
Explain what will happen before positioning the child.
Use a calm voice
Avoid hurried instructions, visible panic or repeated warnings that something may hurt.
Use distraction
A video, song, story, toy or counting game can help the child focus on something else.
Practice staying still
Ask the child to remain still for five seconds before beginning. This helps them understand exactly what you need.
Allow appropriate choices
The child might choose:
- Which adult sits beside them
- Which toy to hold
- Whether to look or look away
- Which video or song to use
- Whether to sit or lie down when both are safe
Do not promise that they will feel nothing
It is better to explain that they may feel a small pull or pinch than to make a promise you cannot guarantee.
Pause when necessary
If you have not yet gripped the tick and the child moves, pause and reposition.
Once you have securely gripped the tick, complete the steady removal rather than repeatedly stopping and releasing it.
Know when to seek help
Professional assistance is safer when the child cannot remain still enough for controlled removal.
How to Remove a Tick From a Child’s Scalp
A tick hidden in the hair can be difficult to grip correctly. Work in small sections and expose the attachment point completely.
Position the child comfortably
Have the child sit with their head supported or lie in a position that keeps the scalp area stable.
Part the hair around the tick
Use a comb or your fingers to create a clear space around the tick.
Hair clips can hold longer hair away from the area.
Use a second adult when possible
One adult can keep the hair separated and reassure the child while the other removes the tick.
Approach parallel to the scalp when needed
Position the tweezers so you can reach the front of the tick close to the scalp without pinching nearby skin.
Do not cut blindly
Avoid using scissors near the tick when its full outline and the child’s skin are not clearly visible.
Recheck the entire scalp
After removal, continue checking the hairline, behind the ears and the rest of the scalp for additional ticks.
When Should You Not Remove the Tick Yourself?
Seek medical assistance when the tick’s location or the child’s movement makes home removal unsafe.
Tick on or very close to the eyelid
The eye can be injured by tweezers or sudden movement. Seek professional help when the tick is attached directly to the eyelid or very close to the eye.
Tick deep inside the ear
Do not insert tweezers, cotton swabs or camera accessories into the ear canal.
Tick inside the mouth
Seek medical or dental assistance rather than attempting removal from the tongue, gums or another difficult area inside the mouth.
Tick in a private or difficult-to-see area
Use appropriate privacy and positioning. Seek professional help when you cannot see or reach the attachment point clearly.
Very small tick level with the skin
A tiny tick may be difficult to grasp without pinching the skin. Medical assistance may be appropriate if repeated attempts fail.
Child cannot remain still
Do not continue when sudden movement creates a risk of skin or eye injury.
Several attached ticks
Professional advice may be useful when the child has multiple attached ticks, especially if some are in difficult locations.
Tick cannot be identified clearly
Do not pull at a mole, scab, skin tag or other unidentified spot. Inspect it carefully or ask a healthcare professional.
Previous attempts have caused bleeding
Stop repeatedly manipulating the area and seek advice if removal attempts have injured the skin or the tick remains attached.
What If the Tick Breaks During Removal?
A small piece of the tick’s mouthparts can occasionally remain in the skin.
Do not panic
The tick’s main body has been removed, which is the most important immediate step.
Inspect the area in bright light
A retained fragment may look like a tiny dark dot or splinter.
Remove it only when it is easy to grasp
If the fragment is clearly visible and can be reached easily with clean fine-tipped tweezers, it may be removed gently.
Do not dig deeply into the child’s skin
If the fragment cannot be grasped easily, leave it alone and allow the skin to heal.
Repeated digging can cause additional injury, bleeding and local infection.
Keep the area clean
Clean the skin gently and prevent the child from scratching it.
Watch for worsening irritation
Seek medical advice if the site becomes increasingly painful, swollen, warm, red or begins producing discharge.
What Should You Do After Removing the Tick?
After removal, clean, document and monitor the area.
Clean the bite area
Use soap and water, rubbing alcohol or another appropriate skin-cleaning method.
Wash your hands
Wash thoroughly after handling the tick and removal tool.
Record the date
Write down when the tick was found and removed.
Record the body location
Note exactly where the tick was attached.
Record possible exposure
Note where the child had recently played, walked, camped or spent time outdoors.
Photograph the bite area
Take a clear close photograph and a wider image showing the surrounding skin.
Check for more ticks
Perform a complete head-to-toe check. Inspect clothing, hats, shoes, bags and outdoor equipment as well.
Monitor the child
Observe the bite area and the child’s general health over the following days and weeks.
Should You Keep the Removed Tick?
You may choose to photograph the tick or keep it temporarily in a sealed container. Local advice and identification services differ.
Take clear photographs
Place the tick in a secure transparent container or on a plain background without touching it with bare fingers.
Use a sealed container
Keep the tick away from children and pets.
Label the container
Include the date, bite location and possible exposure location.
Do not rely on tick testing as a diagnosis
Finding a pathogen in a tick does not prove that it was transmitted to the child, and a negative result may provide false reassurance.
Follow local medical advice
A healthcare professional can advise whether keeping or identifying the tick is useful in the child’s circumstances.
How to Dispose of the Tick
Do not crush the tick with your bare fingers.
Possible methods include:
- Placing it in a sealed container
- Wrapping it securely in adhesive tape
- Placing it in alcohol
- Using another locally recommended disposal method
Do not leave the tick loose where it can crawl onto another person or pet.
How to Monitor the Bite on a Child
Check the area without repeatedly pressing, rubbing or scratching it.
Take a baseline photograph
Photograph the bite soon after removal using bright, neutral lighting.
Use consistent conditions
When comparing the area later, use approximately the same lighting, angle and distance.
Watch the size
Notice whether a red or discolored area remains small, begins fading or expands outward.
Watch the border
Pay attention to circular, oval or irregular expansion beyond the original attachment site.
Watch for increasing inflammation
Seek advice if the area becomes increasingly painful, warm, swollen or produces discharge.
Monitor the child’s general health
Look for symptoms such as:
- Fever or chills
- Headache
- Unusual tiredness
- Irritability
- Muscle or joint pain
- Reduced appetite
- Facial weakness
- A spreading rash
- Other unusual symptoms
Do not wait for a perfect bull’s-eye
A concerning rash does not always have a target-like appearance.
When Should You Contact a Healthcare Professional?
Seek medical advice when the location, removal or later symptoms cause concern.
Contact a healthcare professional if:
- The tick cannot be removed safely
- The tick is near the eye or deep inside the ear
- Several ticks are attached
- The bite area becomes increasingly painful or swollen
- The area produces pus or discharge
- A spreading circular, oval or unusual rash develops
- The child develops fever or chills
- The child develops headache or unusual tiredness
- The child develops muscle or joint pain
- The child develops facial weakness
- The child appears significantly unwell
- You are concerned because of the child’s age or medical history
Tell the clinician about the tick bite
Provide the removal date, bite location, possible exposure location and any photographs you have taken.
Do not use leftover antibiotics
Do not give medication prescribed for another person or a previous illness.
Preventive treatment requires individual assessment
Whether any preventive treatment is appropriate depends on factors such as the region, tick type, attachment circumstances, timing and the child’s medical situation.
Seek urgent help for severe symptoms
Seek urgent medical assistance if the child develops breathing difficulty, severe weakness, fainting, confusion, severe headache, rapidly worsening illness or another serious reaction.
Common Mistakes When Removing a Tick From a Child
Gripping the swollen body
Position fine-tipped tweezers close to the child’s skin rather than around the widest part of the tick.
Pulling suddenly
Use slow, steady pressure rather than a sharp jerk.
Twisting standard tweezers
When using fine-tipped tweezers, pull steadily away from the skin unless the specific tool’s instructions say otherwise.
Using petroleum jelly or oil
Do not coat the tick with household substances before removal.
Trying to burn the tick
Heat can injure the child and is not an appropriate removal method.
Crushing the tick with fingernails
Use tweezers and a secure disposal container rather than bare fingers.
Frightening the child
Explain the procedure calmly and avoid dramatic language.
Holding the child too forcefully
Forceful restraint can increase fear and sudden movement. Seek professional assistance when safe positioning is not possible.
Digging deeply for a tiny fragment
Do not repeatedly injure the skin trying to remove mouthparts that cannot be grasped easily.
Forgetting to check for more ticks
Complete a full-body check after removing the first tick.
Ignoring later symptoms
Removal ends the attachment but does not remove the need to monitor the child afterward.
Frequently Asked Questions About Removing Ticks From Children
What is the safest way to remove a tick from a child?
Use clean fine-tipped tweezers, grasp the tick as close to the skin as possible and pull steadily away from the skin without twisting, jerking or squeezing the body.
Does removing a tick hurt a child?
The child may feel a small pull, pinch or temporary discomfort. Careful positioning and a steady movement help keep the procedure controlled.
Should I take my child to a doctor for every tick?
A visible and accessible tick can often be removed at home. Seek professional help when it is in a sensitive location, cannot be gripped safely or the child cannot remain still.
Can I use a tick-removal tool instead of tweezers?
Yes. Use a suitable tool and follow its instructions carefully, since different designs may require different movements.
Should I twist the tick?
Do not deliberately twist when using standard fine-tipped tweezers. Pull steadily away from the skin. Follow the specific instructions supplied with a commercial tick-removal tool.
What if part of the tick remains in the skin?
Remove the fragment only if it can be grasped easily with clean tweezers. Do not dig deeply into the skin. Keep the area clean and seek advice if irritation worsens.
Should I put petroleum jelly on the tick?
No. Do not coat an attached tick with petroleum jelly, oil, nail polish or similar household substances before removal.
How do I remove a tick from a child’s hair?
Part the hair completely around the tick, use clips when helpful and position the tweezers close to the scalp. A second adult can hold the hair aside.
What if the tick is on my child’s eyelid?
Seek medical assistance. Sudden movement near the eye can make removal with tweezers unsafe.
When should I contact a doctor after removal?
Seek medical advice for a spreading rash, fever, headache, unusual tiredness, muscle or joint pain, facial weakness, worsening inflammation or another concerning symptom.
Your Next Step
Sources
This guide was prepared using information from recognized public-health organizations.
Centers for Disease Control and Prevention: What to Do After a Tick Bite ↗
Centers for Disease Control and Prevention: Tick Removal Fact Sheet ↗
NHS: Lyme Disease and Tick Removal ↗
UK Health Security Agency: Lyme Disease Signs and Symptoms ↗
Learn more about our research and review process in our Editorial Policy and Sources and References.